Section 3 Website Design Skills - includes six lessons on designing the web pages for your business website.

Lesson 2.7 Design Your Business Website

Lesson 2.8 How to Add Links to Web Pages

Lesson 2.9 Create an Internal Style Sheet

Lesson 2.10 Create an External Style Sheet

Lesson 2.11 Page Layout with CSS Grid

Lesson 2.12 How to Make a Menu with CSS Grid

Lesson 2.7 Course 1 Website Creation Review

This is a review of the website creation skills we covered in our first course.

Step 1: Open your file manager and create a website root folder.
Call the website root folder My Website. Also create your images folder, Here is what your website folder looks like with the empty website images folder in it. Then close your file manager.

01

Step 2: Open Bluefish and type your website header and first paragraph.
Here is what the bluefish initial HTML 5 screen looks like:

02

Notice the blank line at line 8. Place your cursor here. Then use the Bluefish Code Completion tool to create your heading tags. Type an opening bracket (shift plus left pointing arrow). Then type a lower case h. Here is what your Bluefish screen will look like:

03

Select the h1 tag pair (with opening and closing tags) by clicking on it. Then click Enter on your keyboard. Then with your cursor still between the two tags, hit Enter on your keyboard a couple more times to create a couple of lines of space between the opening and closing tag. Then type on Line 9 (without the quotes): “This is my first website!” Here is what your Bluefish screen now looks like:

Lesson 2.11 Page Layout with CSS Grid

In this lesson, we will use a new Page Layout tool called CSS Grid to quickly and easily create any page layout you can dream of:

01

Best of all, this tool can be used to create a series of “Responsive” grids that display well on any device used by viewers to access your business website.

Why do we need CSS Grid?

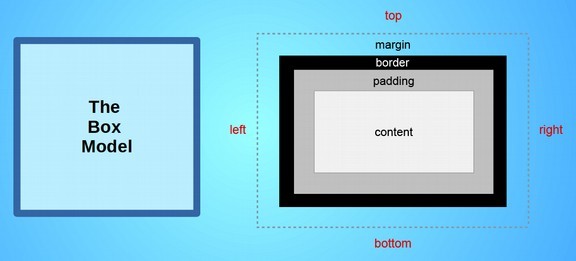
Previously, we learned that we can create colorful boxes on web pages by using the divide tag. One problem with these boxes in the past was that they might not display well on different widths of screens. A web page might look good on a laptop but look bad on a mobile phone or a tablet. What was needed was a way to automatically adjust the width of a series of boxes of content to fit the width of whatever screen it was being displayed on. Recently a new method was developed called CSS Grid to make it much easier for us as web page designers to lay out boxes of content that respond to the width of any given viewing screen.

Our plan will be to first set up a one column layout for narrow screen devices like mobile phones. We will then create a second layout for wider screen devices like tablets and laptops. We will then set up a third layout for very wide screens used with desktop computers.

Our primary goal is to make sure that the main content area of the web page is readable. This means that the lines of text in the main content area should be at least 500 pixels wide but no wider that 800 pixels – as really wide screens have too many words in a line making the text very hard to read. As one example, an 8 ½ inch wide sheet of paper with one inch margins has a column width of 6 ½ inches. As one inch is about 100 pixels, then 6 ½ inches is about 650 pixels. This is a page width most people are used to reading.

We will accomplish this goal by using a single column layout up to 750 pixels in width. We will then change to a two column layout with a 500 pixel main content area and a 250 pixel side bar. Both boxes will expand at this 2 to 1 ratio until the screen width is 1200 pixels – making the main content 800 pixels and the side bar 400 pixels. We will then change to a three column layout where the main content is 600 pixels and both side bars are 300 pixels. This will expand to a maximum width of 1600 pixels where the main content will again be 800 pixels and both side bars will be 400 pixels.

Below are the steps to achieve these three layouts:

Lesson 2.10 Create an Internal Style Sheet

CSS Styles are a set of rules to control the appearance of various elements of our website. CSS styles are independent of our content. Thus, one style sheet can not only be used for several web pages within a single website but also used to control the appearance of several websites. In this lesson, we will use the Bluefish Editor to build a CSS Style Sheet. We will then review web font options and use our new style sheet to modify the appearance of our web fonts.

Here is a diagram of CSS syntax. Note that colons are used at the end of each property while semi-colons are used at the end of each value:

01


How to Create an Internal Style Sheet

There are two ways to move CSS styles outside of the body of our HTML document. These are to create an Internal Style Sheet or an External Style Sheet. We will first learn how to create an Internal Style sheet since it is a little easier.

Lesson 2.9 How to Add Links to Web Pages

What are Links (also known as Hyperlinks)?

When you go on the Internet you can easily go from one web page to another by clicking on a link on one page which then takes you to another page. The Internet is like a huge library of billions of hyperlinked documents. Links provide the bridges to travel between web pages. Even search engines are nothing more than a series of related links.

We use links to move between the pages of our websites too. It is therefore important to take the time to learn how hyperlinks work and then make the effort to add both internal and external links to your web pages.

01

The Link or Hyperlink element is also called the Anchor element. This is why this element begins with the letter A. The anchor element uses an attribute called the Href Attribute. Href stands for the Hyperlink reference.

Once again, we will use the Bluefish Web Editor to help us learn the syntax for anchors and links.

Open your My First Website folder and right click on index.html to open it with Bluefish. Next, put your cursor right after the last closing paragraph tag. Then press Enter on your keyboard to create a new blank line. Type into this line a left angle bracket followed by the letter p. Press Enter to enter the paragraph tag pair. The place your cursor between the tags and type: This is my first link!

Finally, select the word link and then click on the Standard Tab in the Bluefish tool bar. Then click on the black Anchor icon to bring up the Quick Anchor Wizard. Wizards are forms offered by Bluefish that you fill out to insert things like links and images into your web pages.

Lesson 2.8 Design Your Business Website

The first step in designing your business website pages is to divide the web pages into a series of sections called Divides.

How to Create a Divide
So far, the only tags we have used on our index.html file have been the paragraph tag, the heading tag and the image tag. We are now going to add the divide tag – also called the div tag. The divide tag is used to divide a page up into sections. Each section can have its own heading and paragraph tags. The divide tag pair looks like this:

<div></div>.

The divide tag is similar to the paragraph tag in that it is a block element – meaning that it forms a new line – as opposed to an inline element, like the span tag or anchor (link) tag, that does not form a new line.

One use of a divide tag is to create an independent section of the website that has its own style and appearance. CSS is used to create this style.

There is also something called the Box Model that is used to style divides.

01

The box model starts with visible content such as text and images that is surrounded by invisible padding which in turn is surrounded by a visible border which in turn is surrounded by an invisible margin. The box has four sides called top, right, bottom and left.